Footed shafts are a lot of work but if you’re looking to add a little extra weight and strength to the front end of wood shafts, it’s a great way to go. This video will take you through the entire process, from grooving the arrow shaft and making the footing splices to gluing everything up and finishing them off. This will require some power tools, mainly a drill press or router table, and a small bandsaw (you could use a hacksaw instead). I also use a belt sander but this part can be done by hand if you don’t have one.
I used my little 9 inch bandsaw to cut my own footing splices but you can get these pre made from 3Rivers if you want to save some time or don’t have the materials. Mine were made from walnut simply because that’s what I had. Walnut is a great choice due to its toughness and dark color. If you’re after looks, you’ll want a dark colored footing to stand out against the light colored shafts. The shafts I used were Sitka Spruce from TrueShaft. I went with these because, for the spine and diameter, they’re pretty light weight which gives me more flexibility in manipulating FOC (covered in another post here).
To prep the arrow shaft to receive the footing splice, I used the 4 Point footing jig from 3Rivers which worked great. If you want to save a little cash I also found a DIY version on TradGang that looks like it would works well.
Getting things set up is the most challenging part of the whole process. It’s important to have the router bit perfectly aligned with the jig and at the proper depth. If it’s running too shallow, the shaft won’t fit all the way into the footing and you’ll be left with voids causing a weak joint between footing and shaft. If you’re using a drill press, the easiest way to adjust the depth of the cut was through moving the bit up and down as opposed to the table. You’ll also want to run the press at a pretty high RPM for a smooth cut. During initial setup and practice, use some junk shafts or broken arrows. Expect to mess some up before you get the hang of it. Better to start with junk than ruin your good shafts while learning.
Once you’ve got everything set just right, grooving the shafts goes pretty quickly. You’ll just need to pay close attention to the position of the shaft when you rotate it in the jig. If you’re off just a little it’ll show in the final product. When running the shaft through the router bit, make sure you keep good pressure on it to avoid the jig tilting. And if you’re left with some rough edges after the cut you can clean them up with a file.
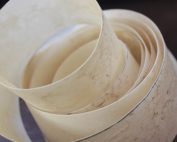
As mentioned, I cut my own footing blanks. Start with an piece of hardwood a half inch by half inch by eight inches long. Set your bandsaw fence to a quarter inch and saw down about 5 inches, splitting the blank in half for that length. Back out, rotate the blank and do it again. Now you have a four pronged hardwood footing blank to slip onto the shaft.
Next you’ll need to coat the surfaces with a good wood glue like TiteBond 3. A sliver of wood comes in very handy for getting the glue into the tight spots. Apply a little to the grooves on the shaft as well. Once everything is coated, but before you slip the shaft into the blank, clamp the blank at the base of the cuts to prevent them from splitting. Now slide the shaft in and seat it in the blank. Give it a little tap with a mallet if it’s not getting all the way to the end. If you can’t get it seated without major cracks in the footing blank, you probably didn’t cut the grooves deep enough. You’ll need to tightly wrap a string around the fingers of the footing blank to keep them tight against the shaft until the glue dries.
When everything is dry, you simply (but not so easily) take the excess hardwood down to the original shaft diameter with whatever tools you want. I used a belt sander, rasp, file, and sand paper – in that order. Just be careful not to get down into the shaft and reduce the shaft diameter itself. When you get close to finished diameter, chucking the nock end of the arrow shaft in a drill allows you to spin it while holding the footing in a folded sheet of sand paper. When all the excess hardwood and glue is gone, finish the shaft off like any other. Congrats, you’ve just finished your first four winged hardwood footed shaft! Now do eleven more…
If you’re interested in FOC, check out this great video explaining the benefits and how to measure it!


